Traveling Light to the Himalayas

141015_PER_0001

The small metal clip doubles as a bottle opener.

The small metal clip doubles as a bottle opener.

There are many obvious perks to being a professional photographer. These include traveling, meeting new people, and experiencing incredible, life moments.
But there is another perk that most photographers don’t talk about – the joy of buying shiny new camera equipment along with the camera bags and back packs in which to carry them.

For whatever reason, camera equipment is considered sexier while bags have been relegated to the step-child of a photographer’s tools. However some photographers (including myself) will admit to being a bag addict while others will not come out of the bag closet. In fact, I have a closet in New York that is not only dedicated to bags and packs, but is also bursting at the seams with these wonderful necessities. Anytime I can find an excuse to to acquire a new bag, my day is brightened.

Currently, I am on my way to the Himalayas where I will be trekking through Nepal, Tibet and Bhutan. Traveling light is paramount to my trip. I surveyed my stash of bags and decided to take the Tenba Shootout backpack which worked so well for me while I was in Morocco last month. Rugged with good pockets, it fits my body well and It’s built in rain cover was perfect protection in the desert sandstorms.

Traveling light also means carrying lighter weight cameras. I chose the Sony A7 series, full frame cameras along with a minimal amount of lenses. These included three zooms: 16-35, 24-70 and 70-200. I also included the 55mm f/1.8 lens for low light situations, and a small flash. Everything fit into the Tenba pack and I still had enough room for various accessories and some snacks.

I own bigger packs which hold a lot of equipment but their weight requires a mule to carry them. I can comfortably carry the lighter pack myself and focus on the biggest perk of my profession – having fun taking pictures.

Working with the new Panasonic GH3


This summer Panasonic asked me to test their new mirrorless, micro four thirds camera, the GH3. I took this opportunity to shoot in southern Utah, one of my favorite places. You can follow my adventures with this great camera. I am told it will be available in December.

Putting the New Lumix GH3 to the Test

I’m at Photokina in Cologne, Germany where today, Panasonic rolled out its Lumix GH3 camera. In late spring the folks at Panasonic asked me to test this new professional grade camera. I immediately suggested shooting in southern Utah. Although my choice was a bit self serving because I love the American west, I knew that Utah with its canyons, mountains and unique culture was the perfect place for photography.

Panasonic worked around the clock to get the prototype ready and it arrived at my studio the day before I was scheduled to leave for Utah. I was pleasantly surprised to find two new zoom lenses, a 12-35mm and 35-100mm, both with a fixed f/2.8 aperture. These two new lenses were solidly built in addition to being small. Luckily I own a GH2 and was familiar with many of the new camera’s functions and most of the seven lenses that came with it. I was able to fit the camera body, all of the lenses including the compact 100-300mm zoom, a flash, food, first aid kit and lots of water into my medium Tenba backpack. The GH3 and I were ready to go and the five hour flight would give me a chance to study the instruction manual.

This camera is also designed with a lot of dials and buttons which make it easy to change settings – when I’m working fast I don’t like scrolling through menus. The viewfinder is very bright and doesn’t have the ‘electronic’ look that earlier Electronic Viewfinders had. And the swivel screen monitor on the back made it easy for me to shoot low and high angle photos, like the image below of the bronc coming out of the chute.

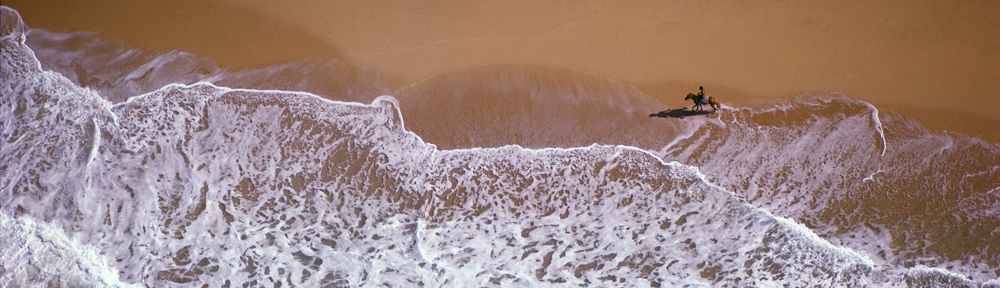
During the ten days I was shooting in Utah I took the GH3 hiking and camping, climbing bluffs and exploring canyons, and exposing it to water and temperatures as high as 112 degrees Fahrenheit. And as I only had one body and needed to change lenses frequently, the camera was also exposed to a lot of dust and sand. This rugged camera had no problems functioning in these extreme conditions. Shooting the spectacular landscapes was inspiring but it was important to test the camera in non-static situations as well. I knew a Native American Pow Wow and a Rodeo would offer numerous action activities.

The GH3 didn’t let me down. Its great autofocus system was responsive and fast and the six fps motor was invaluable in capturing the bull and bronc riders. The dynamic range of the sensor was beyond what I expected and produced images with detail in both the highlights and shadows. Of course everyone wants to know if a four thirds sensor can deliver enough quality to make really large prints. Here at Photokina some of my prints are almost four feet long. When I was photographing the action at the Pow Wow and rodeo I was working with ISOs of up to 800 and saw a negligible loss of image quality.

Camping out under Utah’s night sky afforded another unique photo opportunity. I had never seen so many stars. To capture these ‘extraterrestrial’ like images I set the camera’s ISO to 2500 and used an exposure of thirty seconds at f/2.8 with the 12-35mm zoom. While the shutter was open my assistant and I used small flashlights to illuminate the surrounding landscape. Although I expected some noise under these extreme exposure conditions the resulting images were remarkable.

From canyons to cowboys, Native American dancers to skies saturated with stars, the images I shot with the prototype GH3 were beyond my expectations. I can’t wait to shoot my next journey with the production model.

7-14mm at 7mm, f5, 1/500sec, ISO200

12-35mm at 26mm, f8, 1/25sec, ISO200

45mm macro, f4.5, 1/160sec, ISO320

12-35mm at 35mm, f5, 1/2000sec, ISO250

35-100mm at 100mm, f8, 1/200sec, ISO160

7-14mm at 8mm, f11, 1/5sec, ISO200

7-14mm at 10mm, f4, 1/1600sec, ISO400

35-100mm at 41mm, f2.8, 1/1000sec, ISO640

7-14mm at 12mm, f2.8, 30sec, ISO2500

You can click here to see a full gallery of my photos.

White on White

The temperature here in the Arctic Circle north of Svalbard has finally reached 37 degrees Fahrenheit (3 degrees Celsius) and the ice hasn’t melted, leaving seals easy prey for hungry Polar Bears. We were fortunate to see eight, healthy bears this day and to get close enough to photograph them. But how do you shoot (with a camera) a white bear against white ice and get a decent exposure?

In the first and last photos there is enough color in the water to average out the camera’s meter reading. Camera meters need to see tone in a standard way – they try to read everything as a neutral gray. In a colorful scene with a large tonal range the meter is able to produce a good, accurate exposure.

The middle photo is a more complicated story. The image is all white except for the shadow and the bear’s nose. The camera meter really wants to make this photo a nice gray, which would make our white Polar Bear angry and you don’t want to piss off a Polar Bear. So for this situation I set the exposure compensation to plus 2/3 s, which overexposes the image enough to give me a nice white scene and still hold the detail.

In the tragic situation of photographing a starving Polar Bear on land, the meter should do okay with the white and brown tones in the scene. If global warming continues and the Polar Bear’s hunting grounds – ocean ice where it finds seals – freeze later in the fall and then melt earlier in the spring, then we will have more to be concerned about than the correct exposure.

Photographing Fireworks

A fireworks exhibition in Las Vegas

Fireworks’ displays are the highlight of many celebrations in the United States. Cities feature these amazing light shows on New Year’s Eve, centennial events, and most notably, the 4th of July. Their various patterns and colors against the night background can produce stunning visual photographs – images that you can capture by following these easy steps:

Use a tripod and shutter release to keep the camera steady.
Set the ISO at 100-400 and the exposure on manual. (F/8 -11 is a good starting point at ISO 100).
Turn off the auto focus to prevent your lens from searching for a focus point in the black sky, and manually focus at infinity.
Turn off the lens stabilization; it doesn’t work well on a tripod.
Don’t use a wide lens or the bursts will appear very small in your frame.
Watch your framing, the fireworks usually explode higher than you think. It’s also nice to include buildings or vistas in the shot for scale and depth.

And now the big secret: lock your shutter open and hold a black card in front of your lens. When you see a good burst of color, remove the black card for a couple of seconds, then hold the black card over your lens again. Remove the card when you see another burst. Repeat this process of removing the card and releasing the shutter until you feel you have gotten a good set of bursts on that one frame. Usually three to five bursts per frame are enough.

Since fireworks are set off in very quick bursts, your shutter only needs to be open from 20-60 seconds to capture them. You can avoid delays in shooting your next frame by turning off the camera’s long exposure noise reduction. (See my previous blog on night photography to learn more about noise reduction) It is important to shoot as much as you can at the beginning of the fireworks’ display. As the show goes on, smoke builds up from the explosions, which gives the sky a hazy look.

Enjoy the spectacle and have a safe celebration.

A Cooler Full of Strobes

Pack and spare battery in the hotel

Keeping warm in the snow

In an earlier blog, I mentioned a trip to the Arctic that ultimately had to be postponed due to adverse weather conditions. I needed snow but in November and December it rained. In January I was traveling to the bottom of the globe in Antarctica but now in April, I am finally shooting outside of Iqaluit, Nunavut in the northernmost reaches of Canada. The temperature has been hovering around -22C with winds blowing at 20-30 kph. Although keeping personally warm is paramount, my bigger concern is keeping my battery operated gear from freezing. Fortunately my Canon 5D Mark IIs have been operating really well, although I do warm a few extra batteries with my body heat inside of my coat, in the event I need to change them. My biggest concern however has been my battery operated strobes, essential pieces of equipment that I need for the photo I am here to shoot.

I am using the Profoto Acute Bs, a six hundred watt second pack that has always been reliable. But in this extreme climate I worry that the cold may quickly drain the batteries. Fortunately I brought along Alex Stricker, my friend and fellow photographer to lend a hand. Dragging Alex from the warmth of Phoenix to the cold of the Arctic took some creative coaxing and it was well worth it. Besides his photographic abilities Alex is incredibly talented when it comes to building and prepping anything needed for a complicated shot. In this case, we needed to find a way to keep the Profoto batteries warm and Alex as usually came up with a creative solution.

We bought a midsized, styrofoam cooler (rather ironic for our geographical location) and lined the insides with the eight hour, hand warmer packets I had brought from New York. We placed the strobe unit and two spare batteries inside of the cooler, notched out a hole on the lid, and ran the cable through it to the strobe head. To provide additional insulation, we lined the bottom of the cooler with a silver, space blanket. Before I took the cooler into the cold I walked fifty feet down my hotel corridor with my pocket wizard radio tripper to ensure the strobe would fire. It did.

We felt like we were setting up for a tailgate party when we finally brought the cooler outside only instead of fall football weather, it was -23 C, dog sledging weather. But our heated cooler worked great. We were able to get approximately 150 full power shots off each battery and when we finished shooting, the inside of the cooler was still nice and warm; a lot warmer in fact than either Alex or I.

Back Up Your Camera

I know everyone is now backing up their digital images in many different places (at least I hope so), but what about camera backup? I’m leaving Antarctica, heading back to New York down one camera body, my fault for not respecting the limits of my equipment. A few days ago I was photographing penguins and icebergs in the rain, a mild rain. I kept on shooting until my Canon 5D Mark2 stopped working and came up with an Error 20 message. I had used this camera many times in the past in the rain and had encountered no real problems. And although I had a rain cover for it in my backpack, I did not bother to cover the camera. Was I being lazy or did I just have too much confidence in the camera’s weather resistance. And when is a photo worth losing a camera?
When I returned to the ship I took out the battery and CF card and left everything open. I put the camera in a plastic bag with desiccant, hoping it would dry out overnight but the camera still wouldn’t function the next morning. Fortunately I had a backup camera, a Canon7D. The 7D was out in the rain with me when the 5D died but it continued to function.
As I am headed out to Abu Dhabi a week after I return to New York, I sent Canon repair an email to ask if they could fix the camera and get it back to me asap. Their answer was yes. I decided to push the envelope a bit with Canon: as long as I was sending the disabled camera in for repair, I thought I’d send the 7D and another 5DMark2 to be checked. I also wanted Canon to install the new mode selector locking mechanism on all three bodies. When you’re working with gloves and heavy clothing, that dial seems to mysteriously turn from your original setting to one that you’ve never heard of. And even though I don’t anticipate wearing cold weather gear in the desert, I want to ensure that the mode selection dial doesn’t inadvertently move when I pull a camera out of my bag.
If you are going somewhere special, on holiday and especially on assignment, respect your equipment. If you don’t, be prepared with some backup.

10 Basic Tips for Successful Travel Photos

Adelie Penguins Take a Plunge

I’m aboard the Linblad National Geographic Explorer cruising around Antarctica. My goal on this 140 passenger, adventure cruise is to help everyone go home with better photos of this incredible journey. There are many, different levels of photographers on the ship and from my discussions with them I’ve come up with ten tips to help you when you travel with your camera.
1. If you bought a new camera for your trip, familiarize yourself with it before you head out.
2. If you procrastinated about tip number 1, at least bring the instruction manual with you so that someone else, (like me) can help you understand your camera.
3. Bring extra batteries and extra memory cards; you always shoot more than you expect. On this trip we are witnessing thousands of penguins – swimming in the sea, diving from ice floes, sitting on their nests, and marching up and down the beaches. Shooting wildlife means shooting a lot of images. A good rule in this situation is: shoot first, edit the garbage later.
4. Look for images that you can shoot with the equipment that you have. Don’t be envious of a fellow traveler’s super telephoto lens. If you can’t get close to your subject then think of other types of photos you can do.
5. See like your camera. Our brains can look at a big scene and focus in on details – cameras do not have that ‘wide angle telephoto’ ability. If you shoot what your brain sees you will come home with a lot of wide scenes with teeny, tiny detail over a wide area. Keep something large in the foreground as an anchor to your images.
6. Bring a camera that you will take with you when you head out. A large camera left behind in your room is no match for a smaller camera you can easily carry. It’s always better to bring back a photo of lesser megapixels than no megapixels at all.
7. Don’t depend on your zoom lens – use your legs to zoom. By walking up to and around your subjects you can shoot from different angles and create unique images. If you just walk, stop and zoom, you will never discover your subjects’ full potential.
8. Research your destination before you leave home. If you are familiar with the culture and geography, you will be prepared to make more intelligent photos. Look at published travel books and online sites to find photos of your destinations. These images can serve as guides to what you may want to photograph.
9. The primary factors that will make your photos better are light, composition, and moment. Look at the light, watch the shadows, and see what angles make the best use of light to give your subject dimension. When you compose your photo, make use of all the space or real estate in your frame – do not put the focus bracket in the center of the viewfinder on your friend’s face and then shoot. You will end up with the top half of your photo filled with sky or unimportant background. After you focus on a face or object, lock in your focus and recompose to take advantage of the full frame. Look at all four corners of the finder and know what’s in the picture. The moment – whether it’s your friend laughing or an animal turning it’s head just the right way, can make an ordinary photo into a great photo.
10. Patience is a virtue– do not leave it at home. If you want to create images above the ordinary, there is no underestimating the importance of taking your time. Wait for the light to look great on your subject, wait for the moment. And in my case yesterday, wait for the crazy bunch of Adelie penguins to make up their minds to dive into the water.

Tis the Season to Shoot in Cold Weather

Ira Block and Naomi Uemura at the North Pole

I’m planning a shoot up in the Arctic pretty soon and thinking this would be a good time to review shooting in the cold.
Winter is a terrific time to take photos but if you’re not properly dressed for cold weather, you’re focus will be on staying warm rather than on waiting for the right moment, or light to make your picture. As this is not a ‘fashion’ blog, I will assume you know how to dress for the cold but I will mention one clothing issue – gloves. Hands get cold very quickly and it’s impossible to operate your camera with thick gloves. I usually wear three pairs of gloves: a thin first layer, a medium, second layer, and then a big pair of mittens on a string running through my coat. When I’m walking around, all gloves are on and my hands are warm. But when I’m ready to shoot, I shake off the loose fitting pair of mittens on the string and work with the two pairs of lighter gloves. I do know however that even if you’re properly dressed; if your cameras and lenses cannot function you won’t be coming back with any images.
My second photo shoot for the National Geographic Magazine began when Bob Gilka, the director of photography, called me into his office and asked me to get ready to head north. My assignment was to document the famous Japanese explorer Naomi Uemura’s attempt to reach the North Pole by dog sledge. At this point in my career, the coldest weather I had experienced was at the University of Wisconsin in Madison; and it was cold. So cold in fact that I didn’t bother going to classes because I wouldn’t venture outside.
My expedition to the North Pole was pre digital –that means film, mechanical cameras and non- auto focus lenses. None of these relied on batteries, the weakest link in cold weather. Today, since our digital cameras and auto focus lenses are battery dependent, it’s important to keep these batteries warm. Some photographers prefer to keep their camera and lenses under their parkas to keep them warm. The problem with this method however, is that you can miss a great photo while you are fumbling around under your parka to find your camera. My technique is to keep a few extra camera batteries close to my body, under my coat where they can absorb my body heat. When the battery in my shooting camera starts to die, I just plug in a warm battery and put the cold battery under my coat where it warms up and regains some of its power. By rotating batteries in this manner I can shoot outside for many hours. Another way to save battery power is to turn off your lens stabilizer; it really consumes a lot of power and drains batteries quickly in cold weather.
When you finally decide to head indoors, you may experience a new problem – condensation, which will cause your lens to fog up. If you and your camera have been outside in weather below 20 degrees Fahrenheit for awhile, the camera and lens will get ‘wet’ when you come inside to warm, humid air. One way around this is to wrap your camera and lens in an airtight plastic bag so the condensation forms on your bag, not on your camera. As I usually have two bodies and three or four lenses with me, I don’t want to spend the time wrapping each camera and lens individually. I’ve found that I can just put my entire camera pack in a large trash bag, squeeze out the air and put a twist tie on the end to achieve that same effect. When I come inside, I leave the bag in a cool spot in the house, usually on the floor (as heat rises), which works very well. It may take as long as four hours for your equipment to acclimate to the warmer air so you’re not going to be able to shoot something inside right away. Therefore if you need to work both inside and outside, use two sets of cameras. Just make sure the outside set of cameras is kept in a safe place, like the trunk of your car.
The same problem will occur if you’re travelling with your gear in a warm car in an extremely cold climate. To avoid the lens fogging sand condensation problem, do not put your equipment in front of a vent blowing hot air. Leave it on the floor of the back seat or in the trunk.
When I went to the North Pole I used an old mechanical Nikon camera and I kept my hand held lightmeter inside my jacket. My biggest problems were film cracking and lenses freezing. To protect my film I kept it warm inside my jacket, and loaded it into the camera very slowly. This technique eliminated static electricity on the emulsion and prevented the cold, brittle film from splitting apart. The old lenses had metal, focusing mechanisms that were lubricated with an oil to keep them turning smoothly. Unfortunately, when it was very cold this oil would begin to thicken and would make focusing very difficult. I tried replacing the oil with a much lighter grade, however, I was shooting in minus forty degrees temperatures and my lenses still froze up. When I relayed my problem to the guys in the National Geographic photo equipment department they were able to score some synthetic oil from NASA, who had solved similar lubricating problems in the sub zero temperatures of outer space.
Fortunately, the modern autofocus lenses do not have the lubrication issues, which leaves us only to deal with battery function and condensation when going from cold to warm. Shooting in cold weather can be both challenging and fun. But remember, condensation will occur on the LCD monitor and viewfinder if you exhale with your camera pressed against your face. So hold your breath, focus and take great pictures.